Load Testing with SoapUI
In this blog, I’ll describe how to load test web services using the SoapUI. But first let me explain the different types of load testing that are executed in AUT.
Load testing, or performance testing, is actually simulating multiple users load on the AUT and see how the application fares under such loads.
Here are some performance testing types that we generally come across.
- Load Testing – This testing is when the application is put under various user loads to see the application behavior. The number of users may vary with different sets of input conditions and is generally defined in the performance requirements.
- Stress Testing – This testing is when load is increased to the point where the application breaks. This is generally used to find the threshold or breaking point of the application.
- Endurance Testing – This testing is when the AUT is run for an extended period of time under a load to make sure the application is sustainable.
- Baseline Testing – This testing is when the AUT is run under 1, 5, 10, and 20 users to see the behavior. This test actually creates the base on which we run our performance test. It is very important to understand that running a baseline test actually helps you identify most of the performance issues.
- Volume Testing – This testing is when the application is run with a huge amount of data to verify the application behavior
Now let’s start using the SoapUI (Free version) and see how we can use it to do a load testing of web service.
Adding the Load Test to your existing test case → Open the SoapUI and select any existing testcase, then right-click on it. Select “New Load Test” from the options (or press “Crtl + N”). It will show a dialogue box asking you to enter the name of load test.

Once you click “OK” it will add this test and you’ll see the following screen.
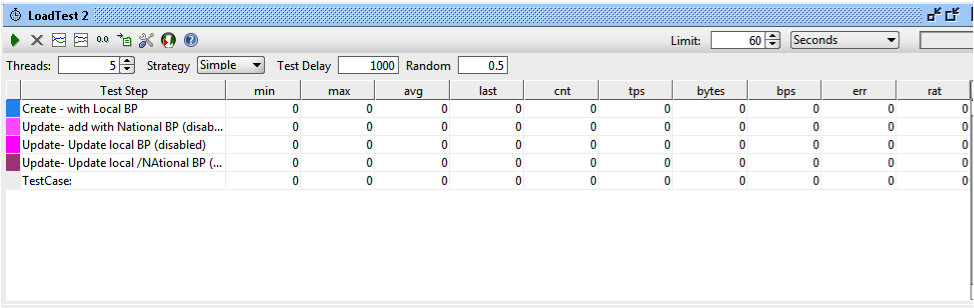
As you can see, there are 4 steps added under “Test Step” because the test case that I chose has 4 steps. Also notice all steps except the first are marked as disabled because I disabled those in the test case. If you want to run all or some steps in your load test, you can simply enable/disable them in the test case by right clicking and selecting the appropriate option.
Now let’s check out the different buttons/options present in the window.
The first icon in the top left corner is a “Play” button icon that runs the load test. The second icon is used to stop the current execution. The next 4 icons are related to Statistics graphs, and then there is the option icon. Following those icons is the icon used to convert this test into a loadUI test case, and the last icon is help.
Limit will allow you to set the limit in seconds, total runs, or runs per thread, so you can choose how your test will run.
The next Box shows the percentage of the current test execution.
Threads allow us to set the number of virtual users we want to run this test. The default value is 5.
Strategy – This is how we want to run the load test and it should be chosen based on the requirements. Let’s see the different strategies and their significance.
- Simple – This is the default strategy to be used. It runs the test case with the number of visual users defined in the “Threads” and you can also define the delay in between each run. The “Test Delay” field lets us define the delay in milliseconds. “Random” defines the order of randomness you want in the delay, with “0” meaning no randomness and “1” meaning all random. This strategy is good for running the baseline tests.
- Burst – In this strategy, it runs all the defined threads at once for the time specified into “Burst Duration” and then it waits for the time defined into “Burst Delay”. After that, it will burst all threads again. It’s good to test the recoverability of the application.
- Variance – In this mode, the test runs with the specified threads for the duration that was specified into “Interval” in seconds and the thread count varies ups and downs (like ECG readings) with the order defined into the “Variance”. So if we set the number of threads to 6, the Interval to 120 seconds, and the variance to 0.5, then the test will run for 120 seconds with threads ranging from 3 to 9. This strategy is good for stress testing, as well as running to see the baseline test once we have done the “Simple” Strategy for baseline.
- Thread – This strategy is used to observe the AUT behavior. The virtual users increases by an increment of 1, starting from the value set at “Start Threads” and continuing until “End Threads” within the time specified into Limit. It usually used to find the breaking point.
When the test is running, the statistics are collected and displayed under the following headers:
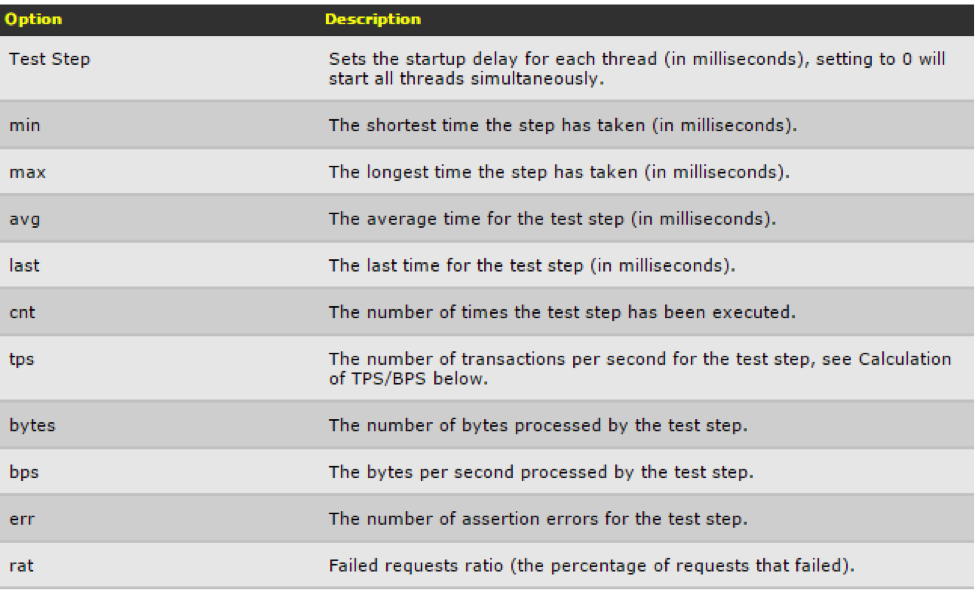
Load Test Assertions: Assertions measure the actual values against the defined values for the test step and log the number of assertions errors under “err”. We can add assertions to the test steps by right clicking on the step and selecting “Add Assertions”. We have to choose the assertion type while adding the assertion from the given list. The following are the assertion types:
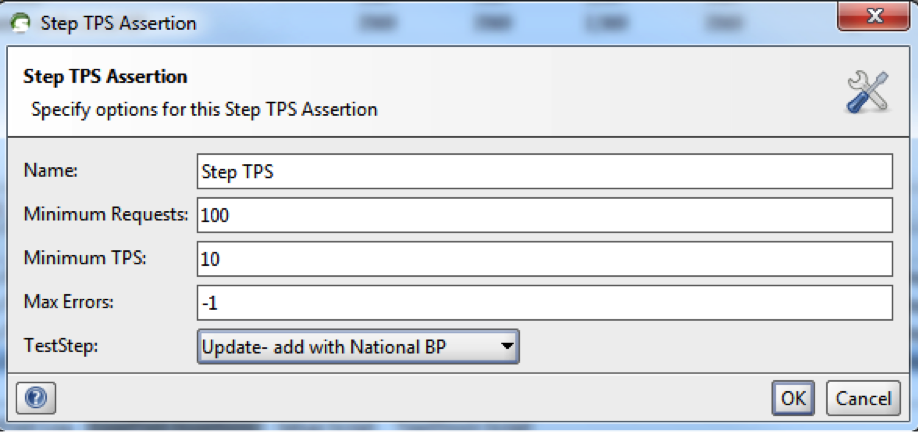
1. Step TPS: This assertion is used to verify the Transaction per second of the test step. When you select this type, a model window opens for this assertion and has the following options—
- Name – Define the assertion name.
- Minimum Requests – This feature lets you define the minimum number of requests that you want to execute before the assertion has to be applied. It’s useful when you start the load test and don’t want to assert some initial requests.
- Minimum TPS – The desired value of the TPS. It will log an assertion error if the actual value is less than this.
- Max Errors – This is the value by which test should be cancelled. “-1” means that there is no such number.
- Test Step – It shows the entire test step defined under the test case and lets you select one on which you have to apply the assertion. It also has the value “Any,” which lets you generalize this assertion for all of the steps, and “Total,” which will assert the total of all the steps against the set value.
2. Max Errors: This assertion is used to verify the total errors that the test step should not exceed the specified value. When you select this type, a model window opens for this assertion with the following options (skipping the common options mentioned above) —
- Max Absolute Errors – This is the absolute maximum numbers of errors allowed for the test step.
- Max Relative Errors – This can have value between 0 and 1. If the value is set to “0.4,” that means that, at most, 40% of the run of the specified test step should result in error.

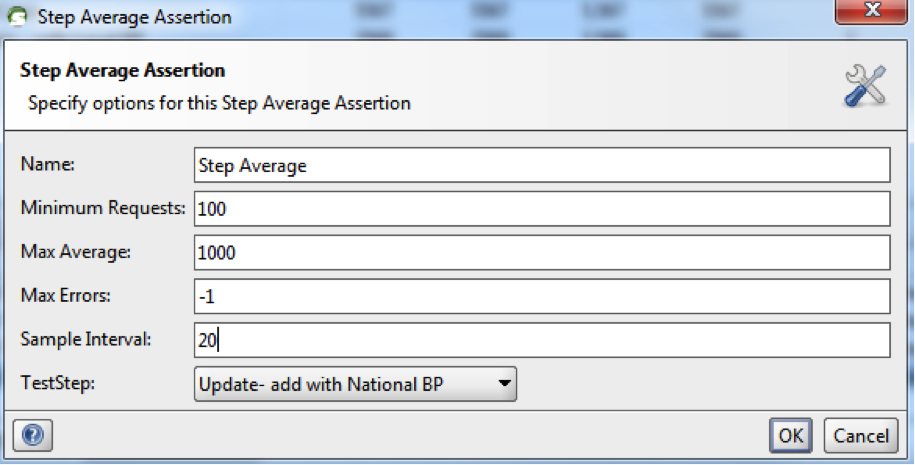
3. Step Average: This assertion is used to verify that the averages of the test step should not exceed the specified value. When you select this type, a model window opens for this assertion with the following options (skipping the common options mentioned above) —
- Max Average – This checks that if the test step average is greater than the defined value then it should log as assert error.
- Sample Interval – The step count used to calculate the average.
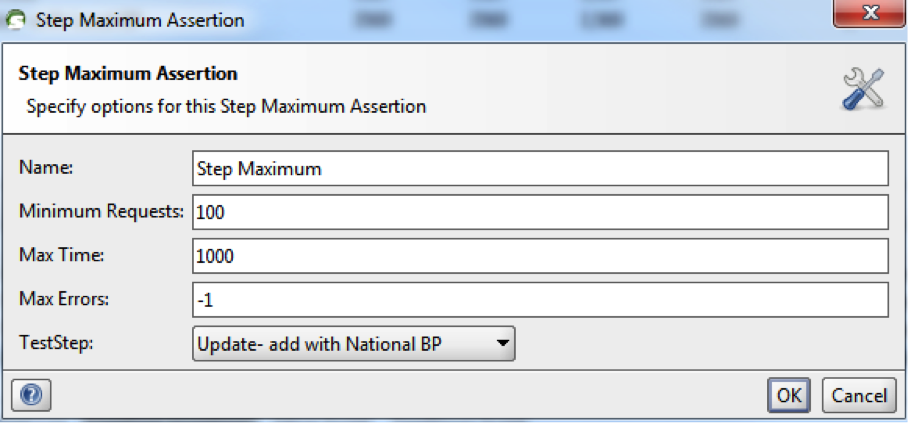
4. Step Maximum: This assertion is used to verify that the time taken by the test step should not exceed the specified value. When you select this type, a model window opens for this assertion having the following options (skipping the common options mentioned above) —
- Max Time – The time that the test step should not exceed or else it should log it as an assert error.
5. Step Status: This assertion is used to verify that the test step is not failed with an error. When you select this type, a model window opens for this assertion with the following options (skipping the common options mentioned above) —
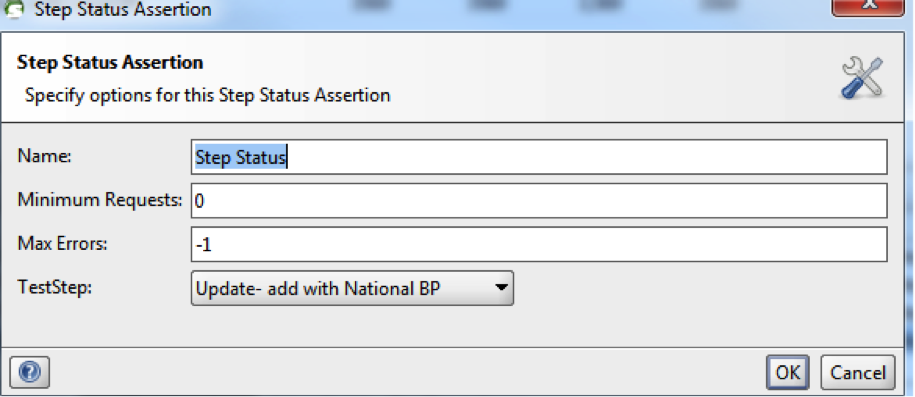
There are Log sub windows in this window in which you can see the logs.
A Real Time Example
Let me walk you through a real time example that I used in my testing. My application lets me add a new entity through the create request and I can update that entity via an update request. I have 3 update steps, so I’ve disabled 2 update steps because they have nothing different in terms of functionality.
I am just doing the baseline test with 1, 5, 10, 20, and 50 users for a 1-minute duration with simple strategy and 1-second delay (I have not randomized the test).
Step 1: Execute with 1 thread. Here is the result:
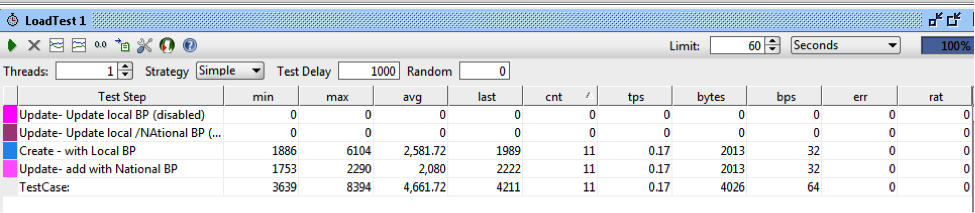
So we can see that create took an average of 2.5 seconds and update took around 2 seconds. This looks OK with 1 user load and with the AUT running on the VM, but this is not the actual load test environment.
Step 2: Execute with 5 threads. Here is the result:
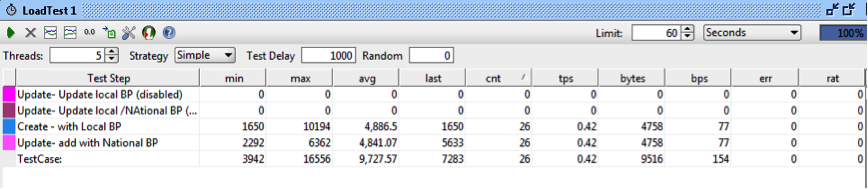
So we can see that create took an average of 5 seconds and update also took around 5 seconds. This is almost double the result of 1 user.
Step 3: Execute with 10 threads. Here is the result:
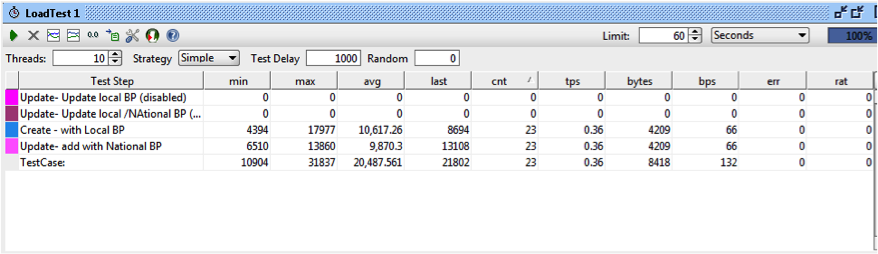
Now the average time to create has gone to around 11 seconds and for update its 10 seconds. Also notice that the max time for create and update has gone up to 18 and 14 seconds respectively. Now we can see that even for 10 seconds, the time is very high as compared to 1 and 5 users.
Step 4: Execute with 20 threads. Here is the result:
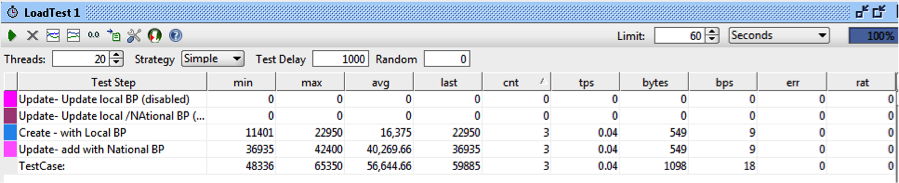
Here the average time to create is around 16 seconds, but the average time to update has gone up to 40 seconds. This gives us an understanding that our application update function is not performing well under even 20 user loads as compared to the create function.
At this point, we know that we should not run the test for 50 users and we can see the performance degradation with 20 users for update. We can identify these kinds of issues earlier with baseline test, as shown above, which really helps developers to fix the major performance issues at this stage itself.
Reference: http://www.soapui.org/
Recent blog posts


Stay in Touch
Keep your competitive edge – subscribe to our newsletter for updates on emerging software engineering, data and AI, and cloud technology trends.