
Automated Testing with Salesforce and Selenium
Salesforce is a leading cloud-based CRM that is used by FCA, GE, Coca-Cola, Philips, and other major brands and companies.
Being a widely accepted CRM application, quality plays an extremely important part in any of its major/minor releases. Automation testing, which is the most active and the highest-demanded way of testing, can make your life easier by taking over monotonous and repetitive test cases, as well as test the test pyramid levels that can’t be covered manually.
Yes, you can reduce the number of defects in an app by writing the unit test case under the criteria of 75-90% coverage, but it would result in only your APEX code/custom objects being tested, which is not sufficient to push your app over the app exchange. Instead, you need to have an automated way to test your Salesforce app from the perspective of integration testing, including both standard and custom implementations.
An open-source Selenium project is now widely used for all browser-based UI testing, which simulates the end user’s actions and is leveraged by Salesforce to automate their >40,000 test cases.
Test Steps, Prerequisites, and Test Data
Most testers would agree that test steps, prerequisites, and test data are the three main components of a test case. These rules are also followed in automation testing, and all the testers know the pain of setting up the prerequisites or getting the valid test data, because corrupt/invalid test data will fail your test case and create a defect that developers can’t work with.
Why shouldn’t we use Selenium alone to test everything?
This is a common question asked by stakeholders, because UI test cases are expected to simulate user actions like clicking buttons, selecting menus, or validating text on a web page. These actions must be tested to ensure the quality of the application as an end user. However, the problem with the Selenium test cases is that they are slowest and have a reputation of being flaky. The solution, then, is to take a hybrid approach: set up the prerequisites by leveraging the APIs provided by Salesforce and then manipulate the Salesforce objects. This saves a lot maintenance effort and reduces the execution time by 20-30%. Additionally, you can utilize any of the other API frameworks like REST/SOAP/APEX.
Having said that, if there is a test case that needs any opportunity as a test data and there are 50-60 such test cases that fit these criteria, then you can create the opportunity through UI for one test case, and then send a “Create Opportunity” request to Salesforce for the others. Leveraging APIs also helps us to fetch data from Salesforce–because it doesn’t have an exposed database, you have to rely on this API framework to fetch the data using SOQL.
| Action | Prefer APIs | Prefer Selenium |
| Setup precondition | Yes | No |
| Fetching/Creating test data | Yes | No |
| Navigating test steps | No | Yes |
| Validation/Verification | Yes | Yes |
Setting up REST APIs Framework
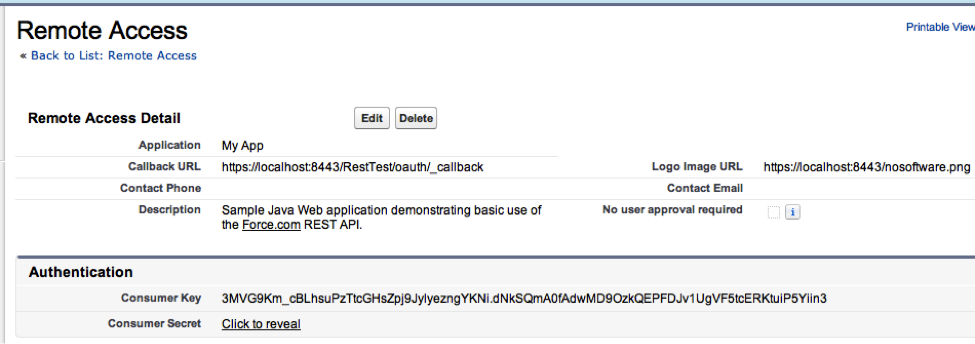
The Salesforce REST API framework communicates over XML/JSON protocol, So if you want to leverage this, you need to add the respective XML/JSON-language bindings in your code. This allows your code to communicate with Salesforce objects. In this case, we will be concentrating on JSON. The next step is to set up the Remote access app through your developer account. This will provide consumer_key/client_id and consumer_secret/client_secret, which will be passed as a header along with the username and password for authentication.
Getting an access token for your user:
Salesforce won’t allow you to access its object only by providing valid username and password; you also need to concatenate access token to become authenticated. You can generate an access token for your user through logging in -> Settings -> Request Security Token. This will send a request for an access token to the registered email address. Please note that this token is reset once you change your username/password.
Flow Diagram of Salesforce Authentication
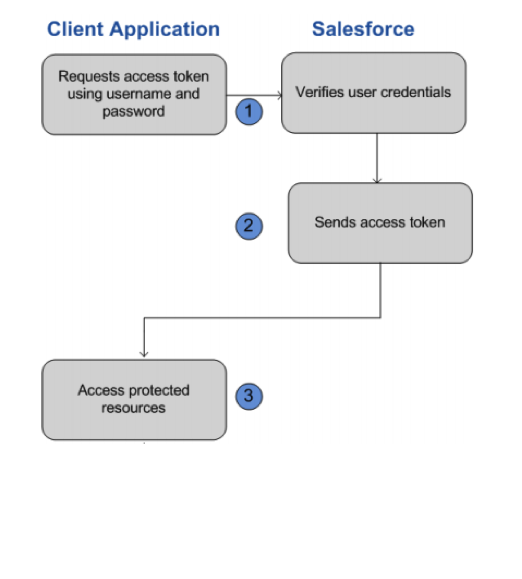
You may also use some rest API testing frameworks like restassured. These will give you the convenience of creating requests in the given().when().then() format, which improves maintainability and saves you effort. Here is an example how you authenticate:
Authentication Request:
username=<user_name>&password=<password><securityToken>&client_id=<clientId>&client_secret=<clientSecret>&grant_type=password
Send the above request to
https://login.salesforce.com/services/oauth2/token
(Note: avoid www.salesforce.com because it will soon be discontinued).
Authentication Response:
{"id":"https://login.salesforce.com/id/00Dx0000000BV7z/005x00000012Q9P",
"issued_at":"1278448832702","instance_url":"https://na1.salesforce.com",
"signature":"0CmxinZir53Yex7nE0TD+zMpvIWYGb/bdJh6XfOH6EQ=","access_token":
"00Dx0000000BV7z!AR8AQAxo9UfVkh8AlV0Gomt9Czx9LjHnSSpwBMmbRcgKFmxOtvxjTrKW19ye6PE3Ds1eQz3z8jr3W7_VbWmEu4Q8TVGSTHxs"}
The above authentication request responds with an auth_id and instance_url. Store it because it will be needed to pass all of the requests you make to Salesforce objects.
Object Access Request:
The following is the request, which calls a Salesforce object and allows you to perform CRUD operations over it. First, you must provide a unique 15-18 digit Salesforce ID and object type (Account, Contact, Opportunity, etc.)
String request_url=<instance_url>/services/data/v<version>/sobjects/<Object_name>/<object_id>
Response response = given().headers("Authorization", "Bearer <access_token>)
				.post(request_url);
Object Access Response:
Assuming the above request made it over the account object for insertion, here is what the response would look like:
Date: Thu, 21 Oct 2010 22:16:22 GMT
Content-Length: 71
Location: /services/data/v20.0/sobjects/Account/001T000000NU96UIAT
Content-Type: application/json; charset=UTF-8 Server:
{ "id" : "001T000000NU96UIAT",
  "errors" : [ ],
  "success" : true }
The 15-18 digit ID is the unique Salesforce identification assigned to each object entry.
Conclusion
By following all of the steps above, you can minimize your test suite execution time and have a quick turnaround. I have concentrated on JSON-based communication, but you can leverage any. Happy testing!
Recent blog posts


Stay in Touch
Keep your competitive edge – subscribe to our newsletter for updates on emerging software engineering, data and AI, and cloud technology trends.