Building Backend Applications with Google App Engine, Google Cloud Endpoints, and Android Studio
The world we live in today is dominated by technology. Mobile applications are just one small part of this complex system and in order to deliver meaningful features, most mobile applications need some kind of backend system. All actions, from storing and retrieving the simplest set of data to authentication and other complex operations, happen on a remote machine rather than on the device itself. As a mobile developer, you can either build your backend from scratch or use the Mobile Backend as a Service approach (MBaaS), depending on the needs of your app.
The Mobile Backend as a Service approach is a model for providing web and mobile app developers with a way to link their applications to backend cloud storage and APIs exposed by backend applications (source one).
Most MBaaS services offer the possibility to store data, use push notifications, and authenticate. But what if you need a custom backend and a CRUD cycle is not enough for your app? Normally this would mean that you must rely on the help of a backend developer. Luckily, there is also the Google App Engine!
Android Studio offers built-in support for adding backend apps to the App Engine with the help of Google Cloud Endpoints. The Google App Engine is a platform for building scalable web applications and mobile backends. The App Engine provides you with built-in services and APIs such as NoSQL datastores, memcache, and a user authentication API, which is common to most applications (source two).
In other words, the App Engine will host your backend app and take care of everything in between. It will automatically scale it, depending on the traffic, so you end up paying the resources you use instead of estimating resources ahead of time or trouble yourself with server maintenance.
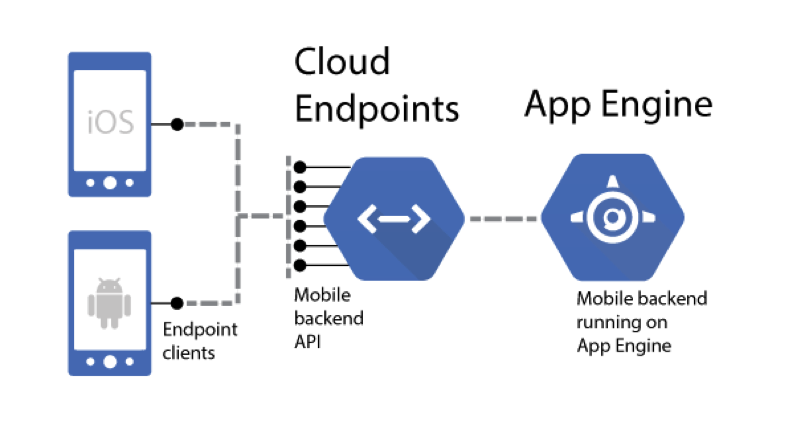
On the other hand, Google Cloud Endpoints consists of tools, libraries, and capabilities that allow you to generate APIs and client libraries from an App Engine application in order to simplify the data access for client applications (source three). So, in other words, we will use Google Cloud Endpoints to create an endpoint API that will be hosted by the Google App Engine. Google Cloud Endpoints will also generate client libraries to access the backend API, sparing us from writing the network communication code ourselves.
In this tutorial, I will show you how easy it is to add backend support to an Android mobile app, even if you have little backend development experience. We’ll assume that we’re building a notes application in which our users can add, delete, and list notes objects. Our entity will be called Note (a Java bean with an ID, title, and description) and based on it, we will generate the backend API with standard CRUD operations.
Prerequisites
For this demo I’ve used:
- Android Studio 2.0 (1.0 should work as well) on a Windows platform
- Android min SDK version 21
- Java 7 SDK
Note: Android Studio contains all of the Google Could Platform functionality, so additional plug-ins are not required.
Add the Google Cloud Module
With the use of Android Studio, we’ll create the backend application through the following steps:
- Create a backend module
- Create an entity class to define the data structure
- Generate a cloud endpoint class to give us the backend infrastructure and APIs
- Generate a related client library to simplify the server API calls from our mobile app
Android Studio offers the possibility to add Google Cloud Modules to a project. Here we can define the model and the endpoints API.
Click on: File -> New -> New Module
Choose: “Google Cloud Module” and click Next.
For the Module type, choose “App Engine Java Endpoints Module.”

The client module should already be selected. We’ll keep the default module name and package.
Click Finish.
When the module is created, the Android Studio also generates client libraries that you can use in the mobile app module and access the endpoint API. Besides that, all the permissions and dependencies are automatically set up.
Since we’re building a REST API, using these libraries is not mandatory. We can easily use the resulted URL “https://<your_project_id>.appspot.com/_ah/api/” in conjunction with any HTTP client. However, if you decide to make authorized calls, using the client libraries will make your life easier.
We have to add persistence to our application and for this we’ll use Objectify, which is a Java data access API specifically designed for the Google App Engine datastore (source four).
dependencies {
 appengineSdk 'com.google.appengine:appengine-java-sdk:1.9.28'
 compile 'com.google.appengine:appengine-endpoints:1.9.28'
 compile 'com.google.appengine:appengine-endpoints-deps:1.9.28'
 compile 'javax.servlet:servlet-api:2.5'
 compile 'com.googlecode.objectify:objectify:5.0.3'
}
Click the “Sync Project with Gradle Files” button.

By default, Android Studio generates an Entity and a correspondent Endpoint class (MyBean and MyEndpoints). In our case, we’ll create a custom entity that will suit our needs.
Create a class called Note. Inside the Note class add 3 fields: ID, title, and description like in the snippet below:
import com.googlecode.objectify.annotation.Entity;
import com.googlecode.objectify.annotation.Id;

@Entity
public class Note {
   @Id
   Long id;
   String title;
   String description;

   public Note() {}

   public Long getId() {
       return id;
   }

   public void setId(Long id) {
       this.id = id;
   }

   public String getTitle() {
       return title;
   }

   public void setTitle(String who) {
       this.title = who;
   }

   public String getDescription() {
       return description;
   }

   public void setDescription(String description) {
       this.description = description;
   }
}
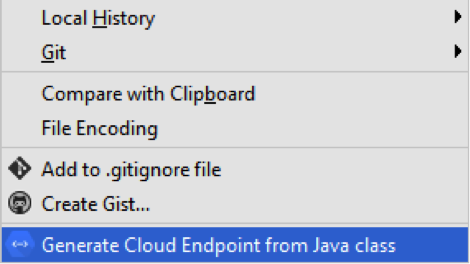
I have used two annotations: @Entity to specify that this is an entity POJO and @Id to indicate the entity’s ID. Using this information, Android Studio offers the possibility to generate the Endpoint class (right click on the Note class -> Generate Cloud Endpoint from Java Class).
The resulted class is called NoteEndpoint. This is basically our endpoints API. It already has standard methods for inserting, retrieving, listing, updating, and removing Note items, but you are free to add your own logic.
Rebuild the project: Build -> Rebuild Project
Right now we can say that we already have a backend app. Of course, we still have to test it and deploy it, but we still managed to build the endpoint API with just a few clicks.
Test the API
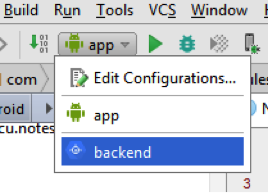
Select the backend configuration and run it.
Start a new Chrome session as described in “How do I use Explorer with a local HTTP API?” and specify 8080 as the localhost port.
Note: On Windows, the only way I could test the endpoints into the API Explorer was to run Chrome as administrator.
You can validate the backend by accessing http://localhost:8080/ in your browser. If everything goes fine you should see this page:

Notice the Google Cloud Endpoints API Explorer button in the red frame. By clicking it you will access the built-in Google API Explorer tool. The screen should indicate that you have 2 APIs (the auto-generated one, myApi, and the one we created, noteApi). The API Explorer allows you to browse through APIs and versions and explore methods for each one of them.
Depending on your method signature and the used HTTP method, the Google API Explorer provides you with an HTML form where you can enter your data. For example, when selecting the insert method, you have a drop-down from where you can select the fields and enter your values. In this way, you don’t have to memorize the entity’s structure. The final result is a JSON object representing a Note.
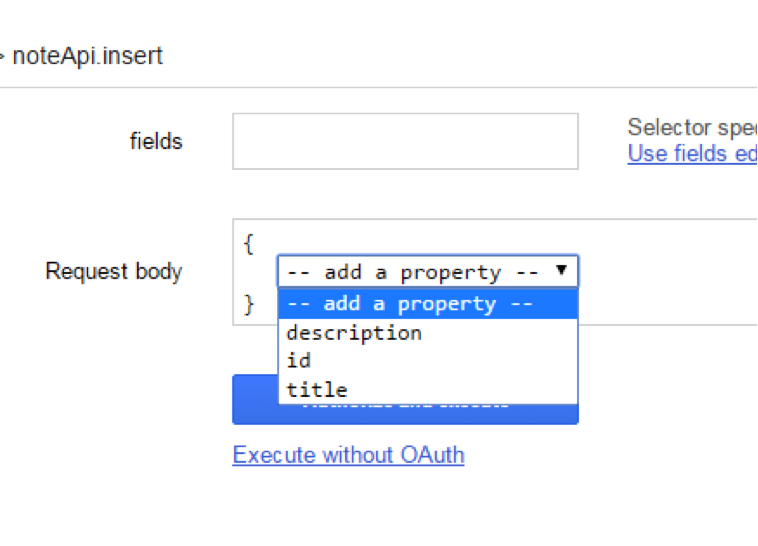
By clicking “Execute without OAuth,” you will invoke the insert method and be able to see the response in real time as given below:
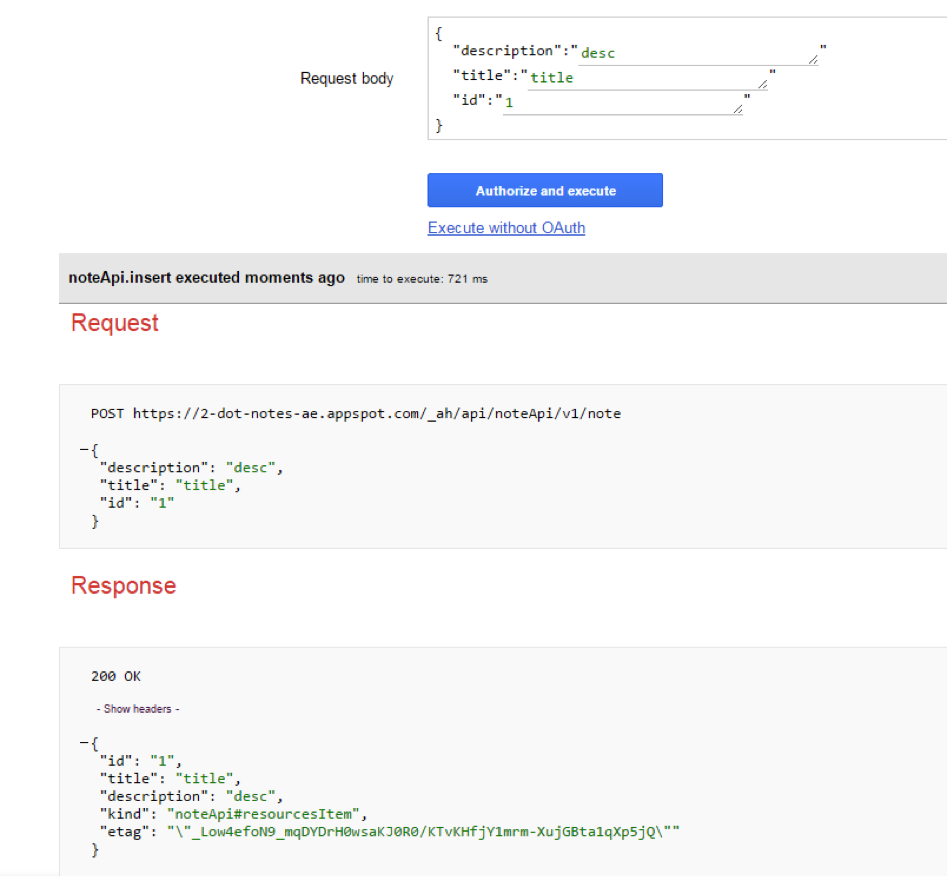
This operation can also be validated by executing the list method and checking if the Note element was added.
App Integration
Now you are ready to test the API in you mobile app. As stated before, the backend module generates client libraries that we can use to access the API. Considering that you will execute network operations, you should use a separate thread for this. The snippet below represents the doInBackground method of an AsyncTask in which we’re using the client library to get the Notes list.
 doInBackground(Void... params) {
   if(myNotesService == null) {
       NoteApi.Builder builder = new NoteApi.Builder(AndroidHttp.newCompatibleTransport(),
               new AndroidJsonFactory(), null)
               .setRootUrl("http://10.0.2.2:8080/_ah/api/")
               .setGoogleClientRequestInitializer(new GoogleClientRequestInitializer() {
                   @Override
                   public void initialize(AbstractGoogleClientRequest<?> abstractGoogleClientRequest) throws IOException {
                       abstractGoogleClientRequest.setDisableGZipContent(true);
                   }
               });

       myNotesService = builder.build();
   }

   try {
       return myNotesService.list().execute().getItems();
   } catch (IOException e) {
       throw new IllegalStateException("Exception when listing the notes " + e.getMessage());
   }
}
Note: If you’re using Windows, you’ll probably fail to run your mobile app if the backend API is also running the following:
Unable to delete file:
<path_to_your_project>\backend\build\exploded-app\WEB-INF\lib\appengine-api-1.0-sdk-1.9.28.jar
In order to resolve this, you have to edit your app run configuration:
- For Deploy, select nothing
- Remove the default Gradle-aware Make task
- Click the + icon and select Gradle-aware Make
- Enter
:app:assembleDebugand click OK - Do the same procedure and enter
:app:installDebug
You should have a configuration similar to the one below:
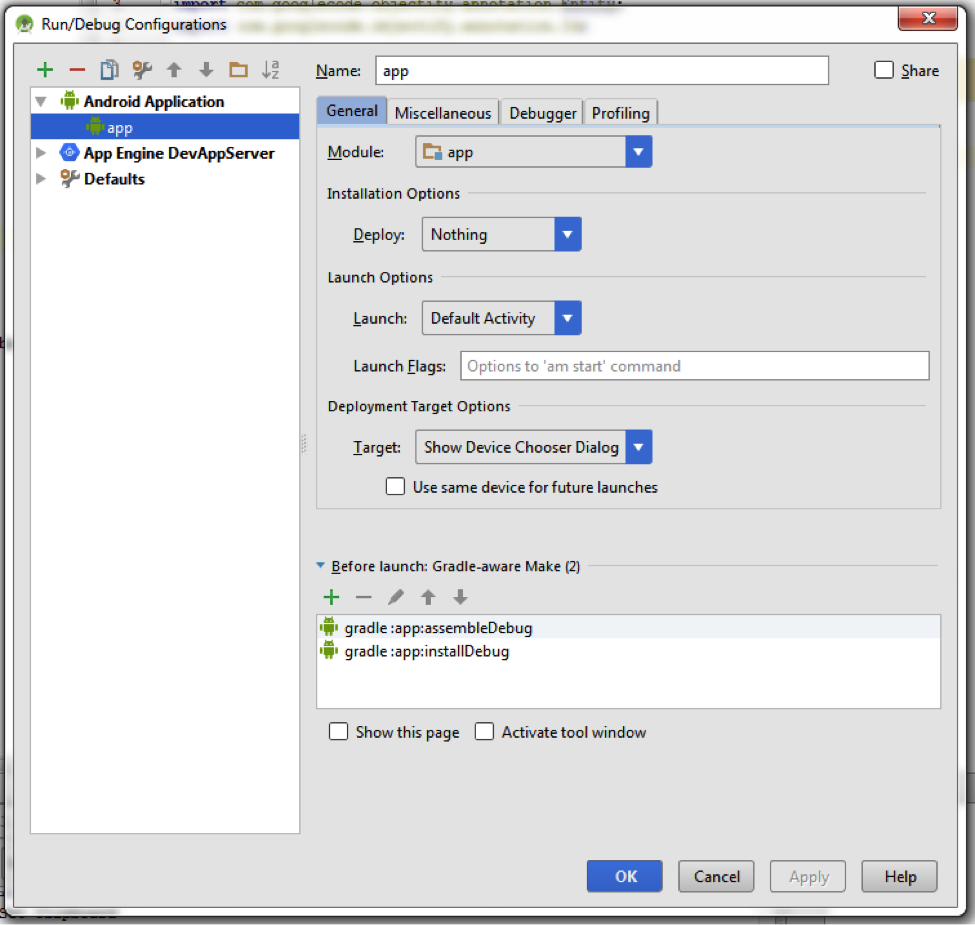
- Click OK
Now you can run your app and test the backend API locally.
Deploy
If the backend is working locally, you can deploy it to the Google App Engine. This is also done with Android Studio.
First of all, you need to create a project in the Google Developers Console or use an existing one. In the Google Developers Console, a project is a collection of settings, credentials, and metadata about the application or applications you’re working on that make use of Google Developer APIs and Google Cloud resources (source five).
When creating the project, you’re also allowed to specify the hosting servers’ location. You can choose between US Central, US East, and Europe West. So, for example, if you’re targeting clients from Europe, you should choose the latter.
Click New Project -> Show advanced options. Choose a location.
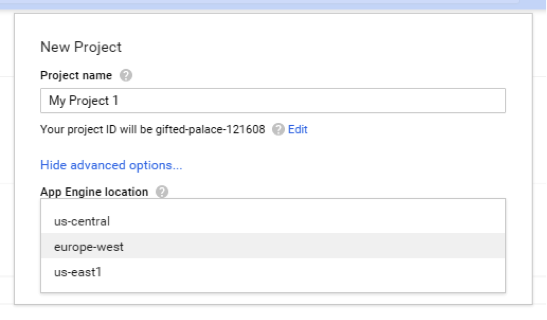
Click Create.
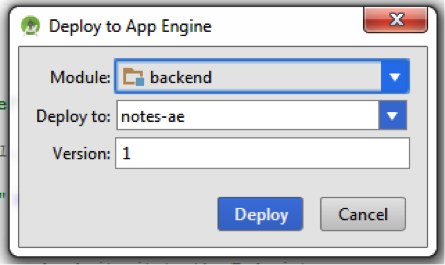
At this point, all you have to do is to deploy the backend app to App Engine (In Android Studio: Build -> Deploy Module to App Engine…).
In the displayed dialog:
- Select the backend module that you want to deploy (Module)
- Select the project that you just created in the Developers Console (Deploy to)
- Specify a version for your backend
As you can see, Google Cloud Endpoints also supports API versioning (Menu -> App Engine -> Versions). We can have different API versions and gradually migrate from one to another until the old one becomes obsolete.

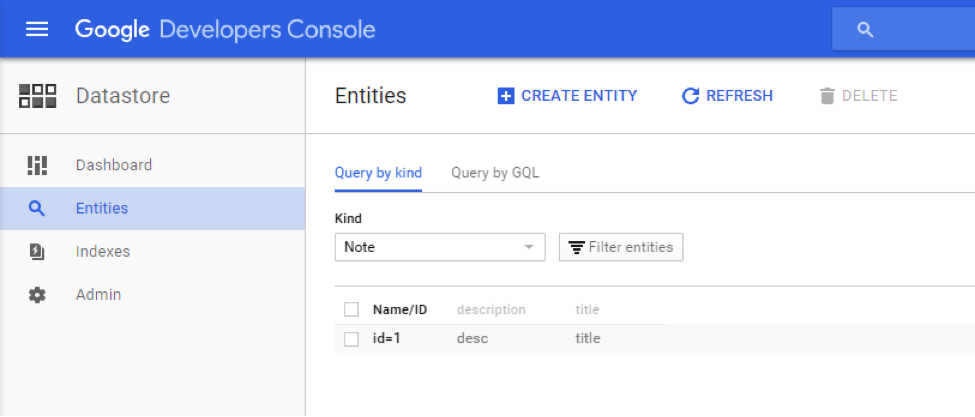
Another cool feature is that you can see your dataset and perform operations with it. Just open the left menu and go to Storage -> Datastore. Here, if you click on “Entities,” you will see the backends associated dataset.
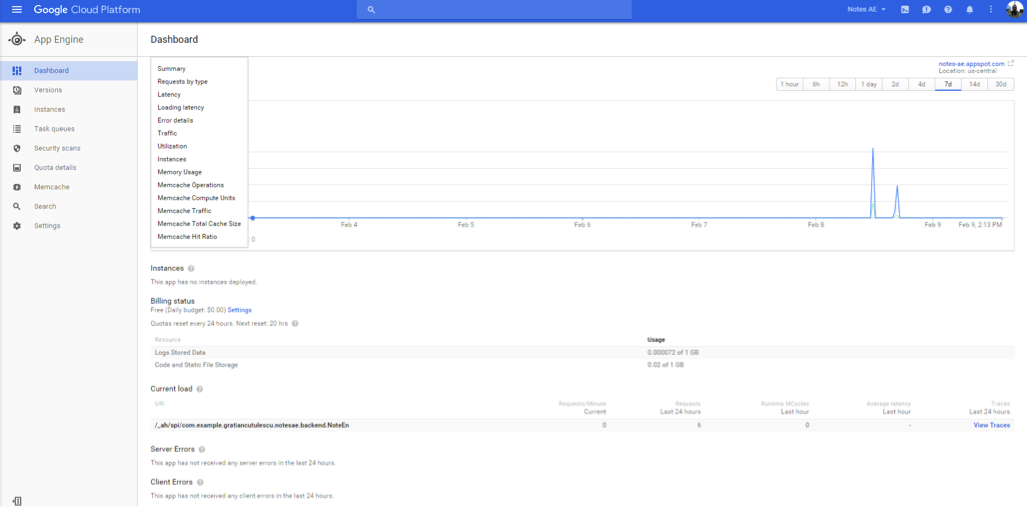
Moreover, the Google Developers Console offers the possibility to check the status of an App Engine project. In the Dashboard page of the project, you can see a usage graph and have the possibility to select the desired metric by using the drop-down in the top left corner. You can also set the preferred period of time for the snapshot (1 hour to 30 days) and select the app version that you are interested in.
In the client app, the endpoint creation is slightly different.
 doInBackground(Void... params) {
   if(myNotesService == null) {
       NoteApi.Builder builder = new NoteApi.Builder(AndroidHttp.newCompatibleTransport(), new AndroidJsonFactory(), null)
               .setRootUrl("https://dot-notes-ae.appspot.com/_ah/api/");

       myNotesService = builder.build();
   }

   try {
       return myNotesService.list().execute().getItems();
   } catch (IOException e) {
       throw new IllegalStateException("Exception when listing the notes " + e.getMessage());
   }
}
The root URL format changed to <a href="https://.appspot.com/ah/api/” target=”_blank”> https://<your_project_id>.appspot.com/ah/api/, where your_project_id is the Project ID from the Developers Console.
In the same way, you can create async tasks for inserting or deleting notes. Integrating them in the application should be no problem for an Android developer (you could create an activity for listing and deleting and another one for adding Notes).
Conclusion
Most mobile developers prefer working on the user experience and design of their app rather than managing the infrastructure that runs it, which, in my opinion, is how it should be.
By using the Google App Engine, the time for adding backend support reduces to minimum, even if you’re a developer with little experience in this area. Not only does it offer you standard MBaaS features, but it also gives you the flexibility of customizing the API.
So, if you’re looking for a way to rapidly add backend support to your mobile app without having to worry about scalability and other hosting issues, you should definitely consider using the Google App Engine.
Sources
- “Mobile backend as a service – Wikipedia, the free …” 2015. 12 Feb. 2016 <https://en.wikipedia.org/wiki/Mobile_backend_as_a_service>
- “App Engine – Platform as a Service — Google Cloud Platform.” 2012. 12 Feb. 2016 <https://cloud.google.com/appengine/>
- “Google Cloud Endpoints – Google Cloud Platform.” 2014. 12 Feb. 2016 <https://cloud.google.com/appengine/docs/java/endpoints/>
- “GitHub – objectify/objectify: The simplest convenient …” 2015. 12 Feb. 2016 <https://github.com/objectify/objectify>
- “Google Developers Console Help — Google Developers.” 2014. 12 Feb. 2016 <https://developers.google.com/console/help/new/?hl=vi-US>
Recent blog posts


Stay in Touch
Keep your competitive edge – subscribe to our newsletter for updates on emerging software engineering, data and AI, and cloud technology trends.